
Star Wars fans will recognize this model of medical droid, known as the 2-1B series.
We first see one in action during The Empire Strikes Back, treating Luke Skywalker after his encounter with the wampa ice creature on Hoth, and then again after he lost his right hand duelling Darth Vader.
The 2-1B with this badge pattern first appeared in LEGO form in the 2011 set 7879 Hoth Echo Base. The version shown here was released in the 2018 set 75203 Hoth Medical Chamber, although I bought mine used on Bricklink.
Behind the Scenes
I get a fair number of encouraging comments and questions about my LEGO photography on Instagram (@toyingwithlight), and I’ve started sharing my creative process.
If you’ve seen any of these before, you’ll know that I consider four fundamental things:
- The Idea
- Light
- Subject
- Composition
The Idea
I was scanning my collection of minifigures for ones that I hadn’t photographed yet, and as my eyes passed over the 2-1B I remembered that my wife had just found a spare syringe when building the Assembly Square set. With COVID-19 vaccinations seemingly on everyone’s mind these days, I decided to put the two together in a portrait.
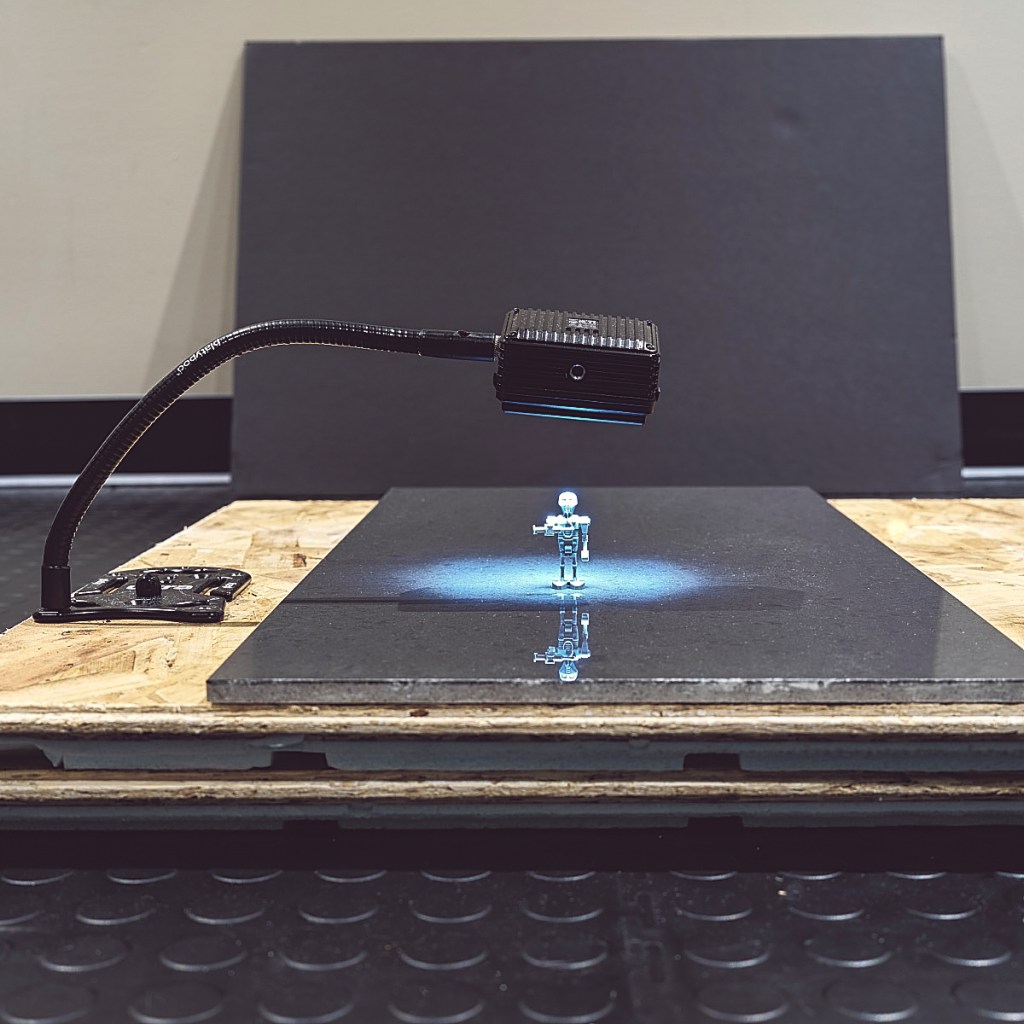
My setup was simple – the minifig is standing on a piece of black ceramic tile, and I have a large piece of black foam core as my background.
Light

I’ve really come to enjoy low key photography – drawing attention to the subject with light, while letting the remainder of the frame fall into shadow. (maybe this is worth an article on its own someday?)
I used a single LitraPro with honeycomb grid, creating hard light with defined shadows while also controlling spill. As seen in the previous image, I positioned the light precisely with an Ultrapod gooseneck arm secured to an Ultrapod Ulta tripod.
Subject

I chose to make the syringe my subject for this photo, and not the droid. I can’t say exactly why, and I might do it differently another time, but I felt it would add the right touch of whimsy for my mood today.
To isolate the syringe as the subject, I had the droid holding it out at arm’s length and shot up close with my macro lens wide open. Knowing that the narrow depth of field at that working distance would draw our eyes to the sharpest part of the frame, I manually focussed on the closest edge of the syringe.
Composition

To help even further in drawing our eyes to the subject, I used the rule of thirds to place the syringe at the top left intersection of lines. I chose to balance the image by filling the middle third of the frame with the droid, leaving both sides as empty negative space.
As for as the technical details of the shot:
- Tripod mounted mirrorless camera set to ISO 100 and triggered with 2 second delayed shutter
- 120mm 1:1 macro lens shot at f/4 and manually focused using magnified live view
- Aperture priority centre-weighted metering with exposure compensation to taste
- Post processing the RAW files with custom white balance, luma curve, saturation, contrast, sharpness, vignette, levels, and dust removal
Bonus Image

Just for fun, I pushed my system to its limits with this photo: my macro lens was wide open and at absolute minimum working distance. Look how quickly the in-focus area falls off!
Conclusion
That’s all folks – a quick look at my creative process for LEGO photography: how I came up with the idea, created mood with light, emphasized the subject, and composed with care.
Cheers!
