
Was there ever a creature as lonely or broken as Gollum? Ironically, the one being who suffered the most from the One Ring was the one who finally managed to destroy it.
Tolkien’s The Lord of the Rings was the first high fantasy novel I read as a child, and it remains special to me in many ways. His epic work not only had an incredible influence on the fantasy genre, but also on popular culture even to this day.
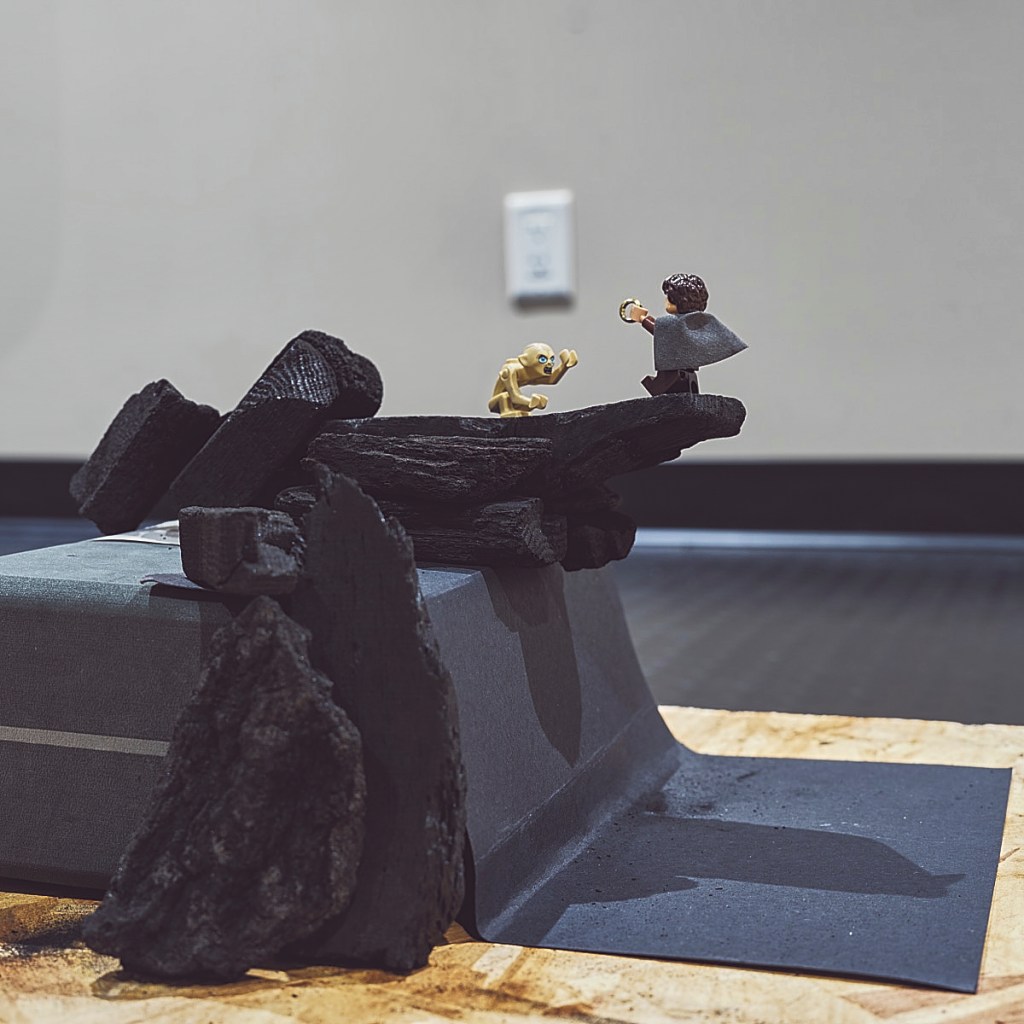
Unfortunately, the LEGO LOTR sets came out during my Dark Age and I am only now slowly adding to my collection. The minifigures in this scene are Frodo – Dark Bluish Cape and Gollum – Wide Eyes, both from the 2012 set 9470 Shelob Attacks.
Behind the Scenes
I enjoy sharing a look at the process behind my work and my creative journey. Writing about it daily is new for me, but it seems to prompt a level of critical thinking that leads me to a deeper understanding and to new ideas.
Photography has long been a passion. With the level of technology available to today’s consumers, it’s easier than ever to take a technically competent photograph. And yet, some images clearly ‘work’ more than others.
With LEGO photography, where we can often control almost every aspect of the scene, I believe that investing time and mental energy in the creative process can help make that difference. So I consider four fundamental things in making an image:
- The Idea
- Light
- Subject
- Composition
The Idea
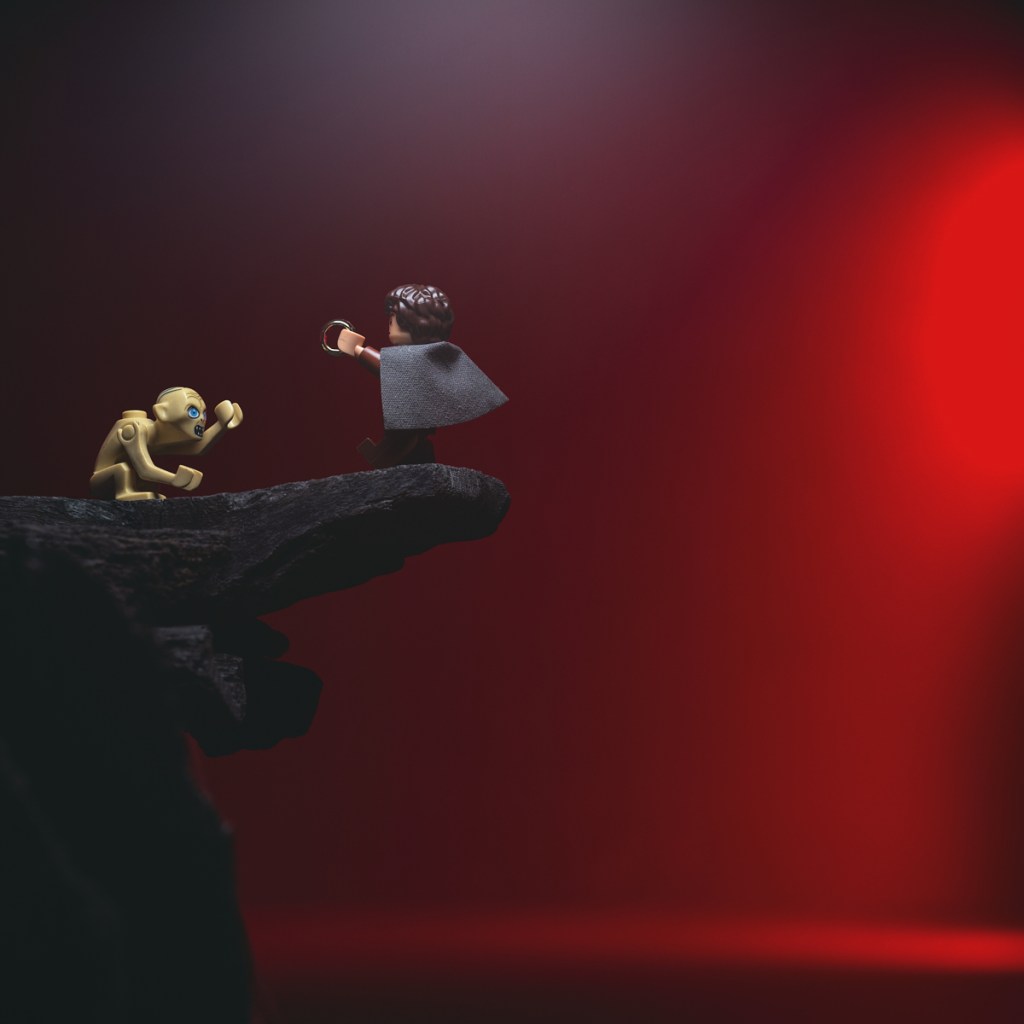
Today’s photo is very clearly inspired by the pivotal Mount Doom scene in Peter Jackson’s film The Return of the King.

I wanted to capture a sense of conflict, of scale, and of fire. For my set, I used pieces of lump charcoal and a yoga block to represent the cliff. The trickiest part was balancing the piece jutting out – I ended up leaning pieces at the far side as counterweights. Two pieces at the front made up my cliffside, black paper for a shadowy chasm completed the look. It doesn’t seem like much, but with careful framing I didn’t need to build anything more elaborate than this.
Light
Lighting was my biggest challenge.
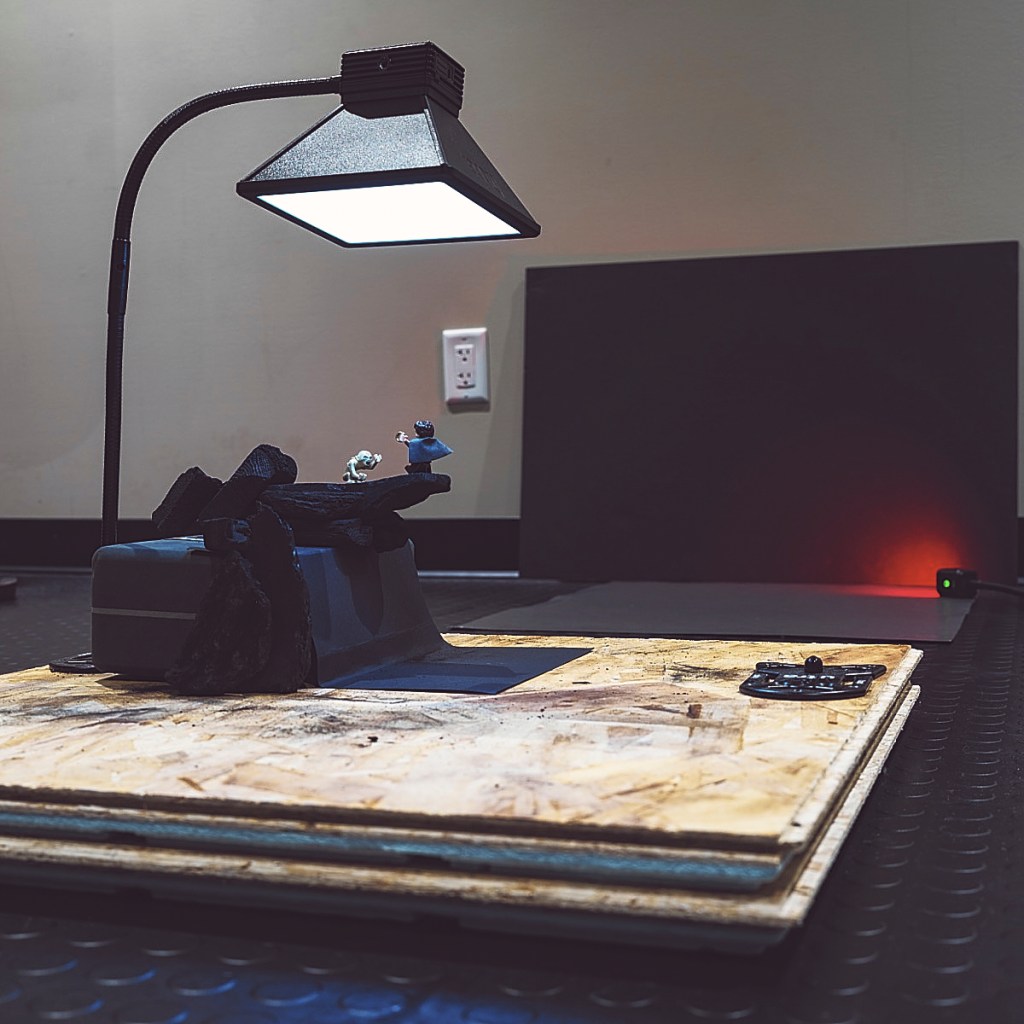
My main light was a LitraPro with softbox held directly overhead by Platypod gooseneck arms and Ultra tripod base. For background light I had a Litratorch 2.0 with red filter, but I wasn’t getting the coverage I wanted:
So I resorted to an old-school lighting technique: light painting.
The technique involves moving a light source while taking a long exposure photograph, either to illuminate part of the subject and/or scene, or to shine light at the camera to ‘draw’.
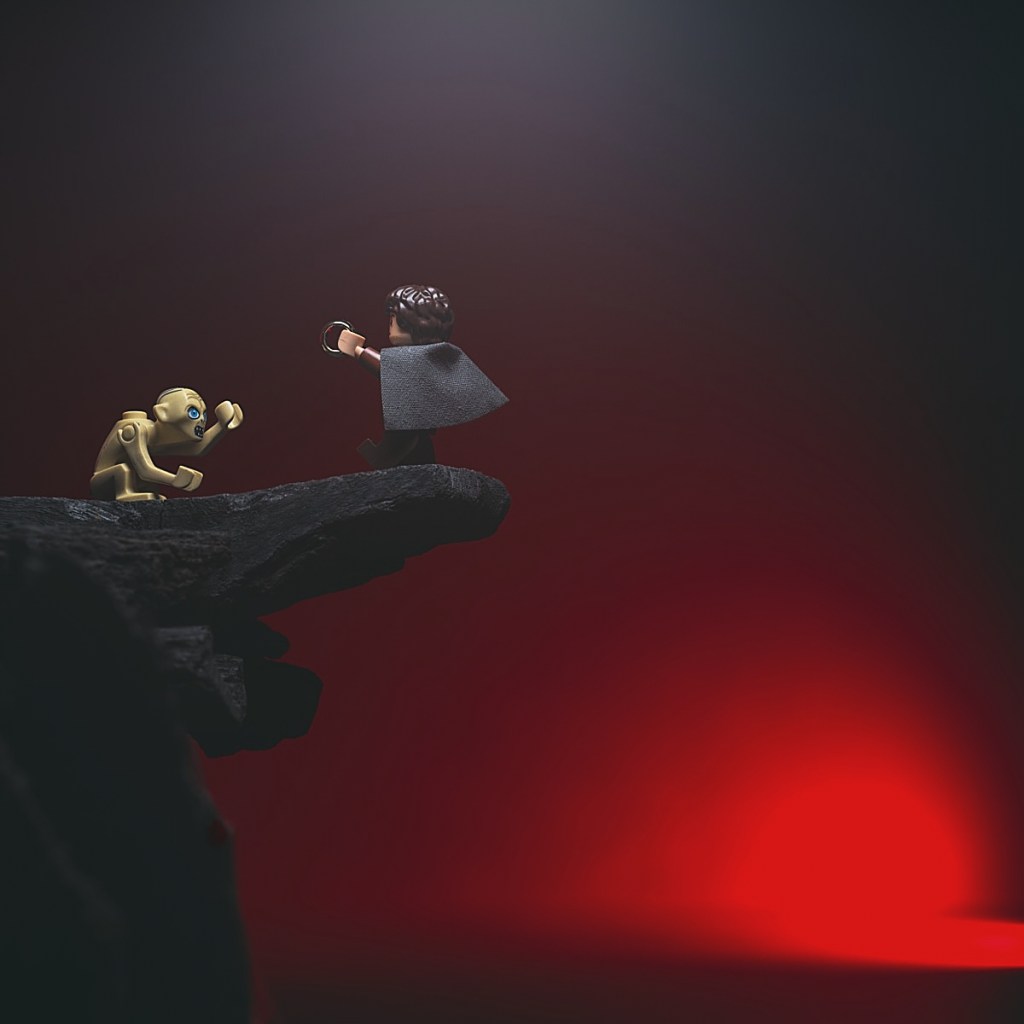
To do this, I adjusted my self timer to a 10 second delay, triggered my shutter, walked over to the background, picked up the light and waved it around for the 2 second exposure time. My first attempt:
If you’d like to try, I recommend:
- tripod-supported camera
- ISO set as low as possible
- delayed shutter
- manual exposure set for a shutter speed of at least a second
You will need to be in a dark space to get a proper exposure, or be using neutral density filter to reduce the light entering the lens. It will likely take some experimentation to get the look you’re going for.
Subject

In this final version of my photo, I consider the One Ring to be the subject, albeit linked very closely with the characters. It’s the focus of the struggle, and both Frodo and Gollum are fixated on it. In post, I added an adjustment layer to increase its brightness and colour saturation to further draw our eye to it.
Composition
I try hard to get as close to the final image as possible in camera. To help with this I compose in live view with my mirrorless camera’s rear display, with a 1:1 crop mask and grid overlay. It looks almost exactly like this:
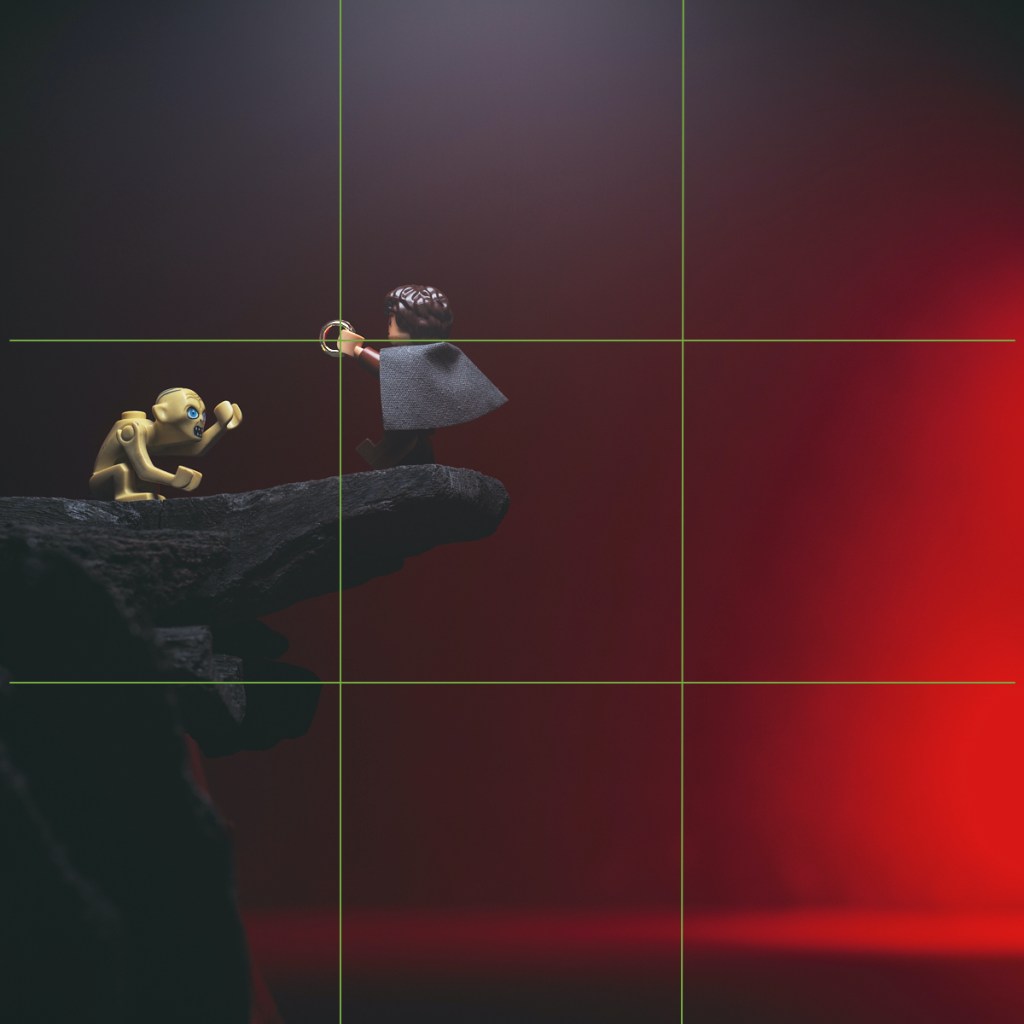
I shot from below to create a sense of height, and placed the One Ring precisely at an intersection of the rule of thirds.
I also used a lot of negative space to create a sense of vastness – mostly dark towards the top (but with a central glow as if light coming from the volcano mouth), and increasingly red towards the right to evoke liquid hot magma.
Tech Stuff
I feel that the exact technical settings don’t matter for the purpose of this article. I’d rather share my standard operating procedure for LEGO photography, which can be applied to all of my shots with but few exceptions:
- Tripod mounted mirrorless camera set to ISO 100 and triggered with 2 second delayed shutter
- 120mm macro lens shot at f/8 and manually focused using magnified live view
- Aperture priority centre-weighted metering with exposure compensation to taste
- Post processing the RAW files with custom white balance, luma curve, saturation, contrast, sharpness, vignette, levels, and dust removal
Up Close and Personal
Macro photography is extreme close up photography, allowing us to see small objects in spectacular detail. For me, LEGO minifigures are perfect subject material.

I used a 1:1 macro lens at its minimum working distance to take this photo of Gollum; I’ve only cropped the sides to make the image square.

And here’s a closer look. Those eyes!
Wrap Up

Time to close out with the before and after, showing the results of transforming my idea through deliberate lighting, subject isolation, and composition.
Best,
Scott.
